How good is your knife?
Everyone likes to work with a good and sharp knife, but often you only notice you worked with bad knives for a long time when you start using a really good knife. Here are a few useful tips to help you define the type of knives you work with.
Look at the knife
Before we start checking the sharpness it is important to really look at the knife first. It is difficult to explain on paper how to recognise a good knife, but there are a few points you have to pay attention to.
Thickness
Look at the thickness of the knife.
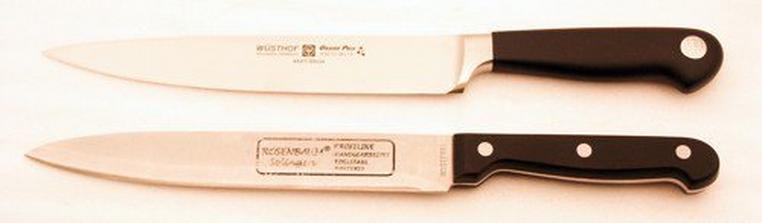
The above illustration shows two carving knives.
At first glance both knives look alike and their biggest difference seems to be the handle. There is a much more important difference though: the thickness of the blade.
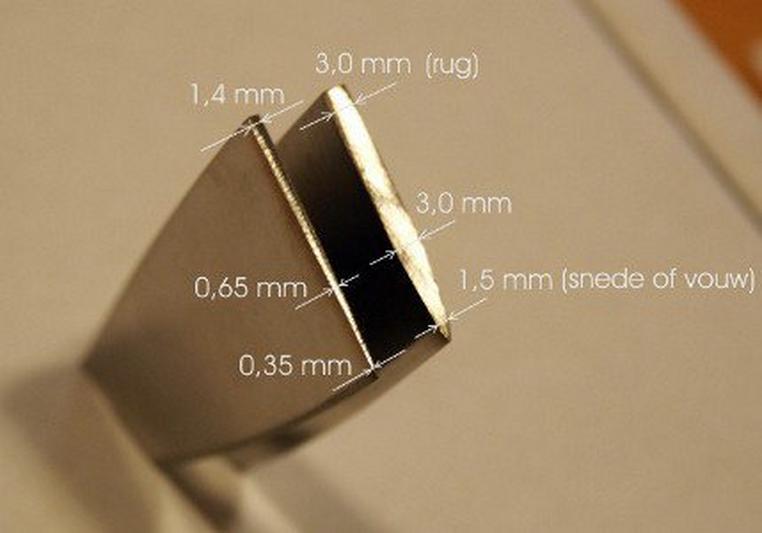
To make that difference visible we have sharpened both knives. That shows the cross-cut of the knife.
The blade on the top knife is 1.4 mm thick and the thickness decreases to 0.35 mm on the edge.
The blade on the bottom knife is 3 mm thick at the top, still 3 mm thick in the centre and then decreases to 1.5 mm at the edge.
To cut easily, a knife must be thin. The thickness at the edge defines the sharpness of a knife for a big part. Even if the knife needs sharpening, a thin knife will still cut reasonably well.
0.35 mm is a perfect thickness for a carving knife. For a chef’s knife that deals with more pressure, the thickness can be a bit higher: 0.45 mm is then still perfect.
The thickness of the spine depends on the height of the knife. For chef’s knives it can be 3.5 mm maximum and for carving knives ca. 1.5 to a maximum of 2 mm.
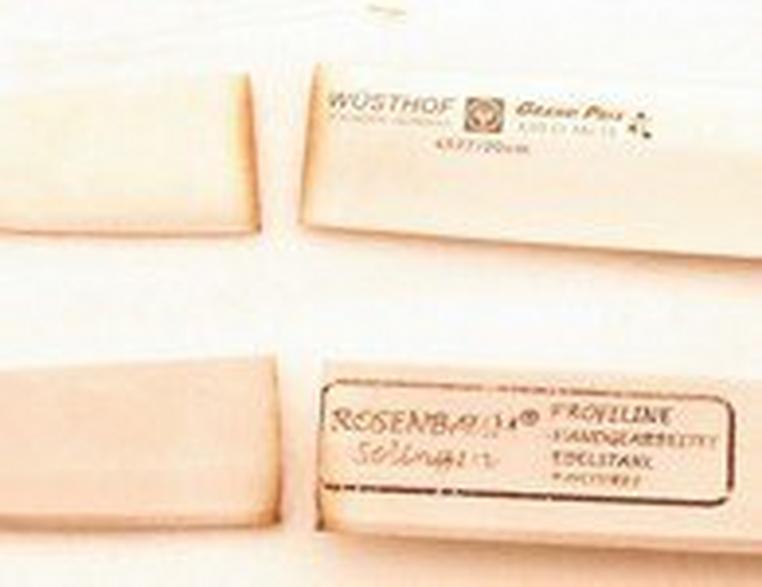
The 'Rosenbaum' carving knife on the picture is much too thick. It does not make sense to sharpen such a knife. Do not be misled by the German terms on the knife. This knife was made in China and exported for less than 1 dollar. Throwing it away and quickly forgetting the bad purchase is the best option.
*There are two exceptions to this story: cleavers and one-side sharpened Japanese knives.
Cleavers must be sturdy and therefore are sharpened a few millimetres thick and convex. Debas and Sashimi knives are Japanese knives, intended for the very thin cutting of vegetables and meat. Those knives are sharpened on one side and very sharply. Because they are only used for cutting thin slices, the thickness of those knives is no problem.*
Too thick blades can also be made by sharpening the knife often. Because a blade becomes thicker towards the back, the edge will become increasingly thicker when you sharpen the knife often. If you treat your knives with care and you maintain them with a ceramic rod for example, this is not likely to happen soon. Even with professional use you can use this knife for a decade without problems.
*If you regularly have your knives sharpened by a professional, your knife will be worn out much sooner.
Professional sharpeners sharpen your knife electrically, and remove a lot of material. There also are sharpeners that thin out your knife, but you then have to be careful that your knife is not made too thin.*
If there are no damages to be resolved, or a too thick edge, don’t have your knife sharpened electrically, but do it yourself with a ceramic rod. It is much easier than you think and quicker than driving up and down to the sharpener.
Stability
A knife can be too thick, but too thin as well. Cheap knives are often made of band steel with a much too thin back. A knife must be stable (tough) enough for its purpose. Filleting knives and flexible boning knives are the obvious exceptions.
Serrations
Only special knives like bread knives and tomato knives should be serrated. Are all the knives in your set serrated? That is the sign the knives were made of an inferior steel quality. They are then serrated to mask the inferior steel and still have the knife cut a bit (or be used like a saw).
Serrated edges give a lot of friction during cutting and an untidy result. A knife made from a good quality of steel does not have to be serrated to remain sharp, and cutting will be a lot easier than with a similar serrated knife.
Visual condition of the knife
After we have defined the type of the knife in the previous steps, we examine the condition of the knife. We go from large to small.
Broken tips, ‘chipping’ in the blade
Look carefully at the blade. When there are broken tips, or chips in the blade, they do not always indicate bad quality, but often a bad owner.
A good knife is always made of hardened steel and is therefore more brittle than soft steel. You can prevent damage to knives by storing them carefully. Prevent the edges from colliding. A knife block or magnetic strip are perfect options. If you still want to store them in a drawer, make sure you protect the blade with a cover.
Another cause of broken tips and chips in the blade is often wrenching or chopping. Never use a knife as a screwdriver or a crowbar and only use a cleaver for chopping.
Bent tips and bent parts of the blade
A lot must happen to bend a good quality knife. The point will bend in case of a fall and when chopping bones with a chef’s knife parts of the blade will bend too. With normal use it is not possible to bend a good knife. If your knife still has a bent blade or a bent tip, it usually is a sign of bad quality steel.
Sharpness: visual check
If the above checks demonstrate that you have a good knife, it makes sense to check the sharpness.
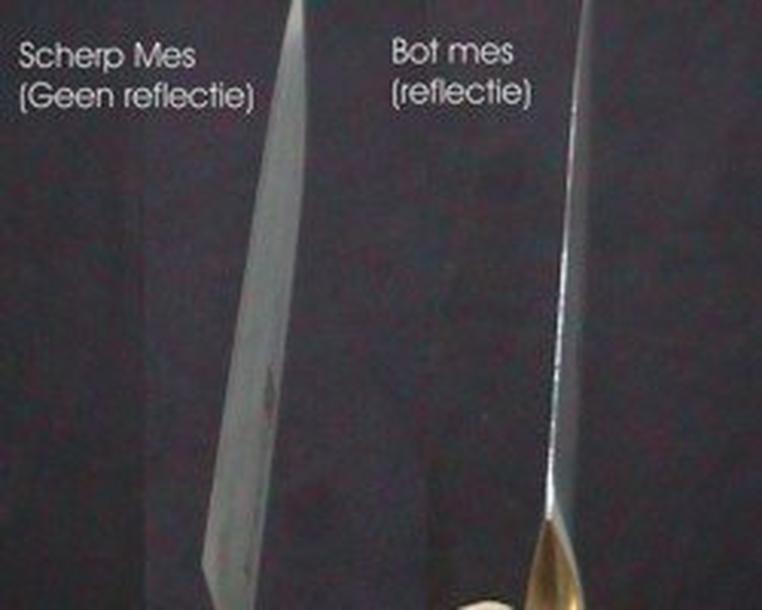
Hold the knife with the cutting edge directed to a light source and check whether the light is reflected in the edge.
If you see the light over the whole length, your knife needs sharpening. If you see the light in a few places, you don’t need to sharpen the knife immediately. It depends on what you want of your knife.
Nail test
If your knife has passed the visual check, you can test the knife on your nail. Hold your nail obliquely and place the knife on your nail without pressure. If it slides off, you should draw your knife over a ceramic sharpening rod. If the knife stays on your nail, it is reasonably sharp (at least in that place).
Paper test
An often used test for the sharpness of a knife is cutting a sheet of paper. Hold a sheet of copy paper and try to cut strips in a 45 degree angle, approx. At 2 cm from your hand. The most critical moment is the first piece. If your knife penetrates the paper without problems, without tearing it, it is sharp enough for kitchen use. Try first with a drawing (cutting) motion. If your knife is really sharp, it also succeeds without drawing motion (i.e. by pushing only).
Tomato test
You can also test the sharpness of your knife by cutting a thin slice of ripe tomato. If you can do this without deforming the tomato, you have a sharp knife.
Shaving test
A knife does not need to be able to shave for kitchen use, but if you want to know whether your knife is really sharp, try to shave the hair on your arm or hand. Never make a drawing motion, because the knife then penetrates your skin.
If you can shave off all the hair in one motion your knife is razor sharp, and you have reached almost ultimate sharpness.
If you can remove a few hairs your knife is still very sharp. If you cannot shave off hairs, but the paper test is no problem, you simply have a sharp knife. If you still want to reach shaver's sharpness, think of using the Spyderco Sharpmaker.
False sharpness
Be cautious with false sharpness. False sharpness is sharpness of a knife caused by a sharpening burr that was not removed well. That burr gives a temporary feeling of sharpness, but disappears soon when you use your knife.
If you want to test the sharpness of your knife, don't do it straight after sharpening, but cut a few times in a piece of wood first. The burr is then removed quickly and you have an honest test.


